Background
The purpose of this post is to describe how to use Open Source tools to automatically analyse phishing emails that users (internal / external) has been sent to pre-defined mailbox. The emails are automatically scanned, and any URLs that are discovered are passed on to third-party providers for analysis. This article will focus only on a SOAR product called Shuffle, but in a future articles Shuffle will be integrated with other widely used Open Source tools including MISP, The Hive, Cortex, and OpenCTI. For analysing emails, we utilise the free online resources Urlscan.io and Virustotal.
Organisations frequently request samples of phishing emails from their clients and other internet users, this is the practise at least in Finland and the financial sector. On the basis of these emails, decisions about taking down phishing domains, etc., can be made. or at the very least to choose whether to request such a takedown.
Some organisations use automation, while others check emails by hand. Automation is an excellent choice for these types of tasks. Of course, not everything can be done automatically, but the initial round of analysis should.
Various financial institutions in Finland have reported at least the following email addresses to which phishing messages can be forwarded.

Needless to say, the same automation techniques may be used to detect phishing emails sent to employees of an organisation, or the automation can be integrated with other tools like phishing simulators e.g., Hoxhunt.
SOAR - Shuffle
Security Orchestration, Automation, and Response, or SOAR, is a set of tools and procedures that enables organisations gather information about security threats from a variety of sources and to take autonomous action in response to minor security issues. By automating repetitive tasks and expediting threat detection and response, SOAR solutions can significantly increase the effectiveness of an organization’s cybersecurity operations.
In 2019, Fredrik Ødegårdstuen (Frikky) launched Shuffle SOAR as a side project to help CERT/SIRT community with various automation-related problems. There are currently two versions available: an Open Source, a self-hosted version, and a SaaS application. Frikky provided a fantastic introduction to Shuffle on his Blog.
Problems Shuffle tries to solve
These included, but were not limited to (no specific order)― @Frikky
- Alert fatigue by giving analysts the tools to automate most alerts
- Remove menial tasks, decreasing employee turnover
- Quick integrations with new tools - OpenAPI
- Giving you a clear overview of your environment by tracking integration usage
Shuffle now integrates with over 150 different technologies and tools, including those that can: Collect data (Emails, SIEM, Threat Intelligence services), Enrich data (Logs, SIEM, Sandbox, TI Feeds), Detect anomalies (SIEM, Yara, Sigma, EDR, IDS/IPS), Respond threats (quarantine hosts, block IPs & URLs, run ansible playbooks, Wazuh), Verify assets (Discover assets & vulnerabilities, search users & entities, monitor domains).
Target State
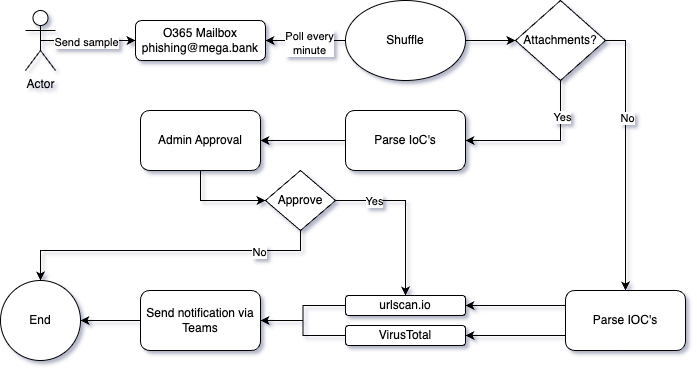
Here is a general concept of what we want to accomplish.
- The user reacts to the phishing email they receive by sending it to a preconfigured O365 mailbox.
- Shuffle checks for new samples every five minutes.
- Emails containing attachments will be checked separately, so Shuffle checks is there any. (this will be covered in the next article)
- Email is parsed, and IoCs (Indicators of Compromise) are gathered
- Gathered IOCs are sent for analysis.
- The findings of the analysis will be sent to the Teams channel.
Installing Shuffle
Shuffle is currently available in Docker (and SaaS). The simplest way to test Shuffle is to use Docker and docker-compose.
- Make sure you have Docker and docker-compose installed
- Clone Shuffle repository from Github
- You can make modifications to
.envfile. For e.g., change listening ports, disable chat, change password and so on. Create a database directory for Opensearch and give permissions (this will be mounted to the OpenSearch container) - Run docker-compose to build up the containers
1git clone https://github.com/frikky/Shuffle
2cd Shuffle
3mkdir shuffle-database && chown -R 1000:1000 shuffle-database
4docker-compose up -d
Configuration and First-Time Login
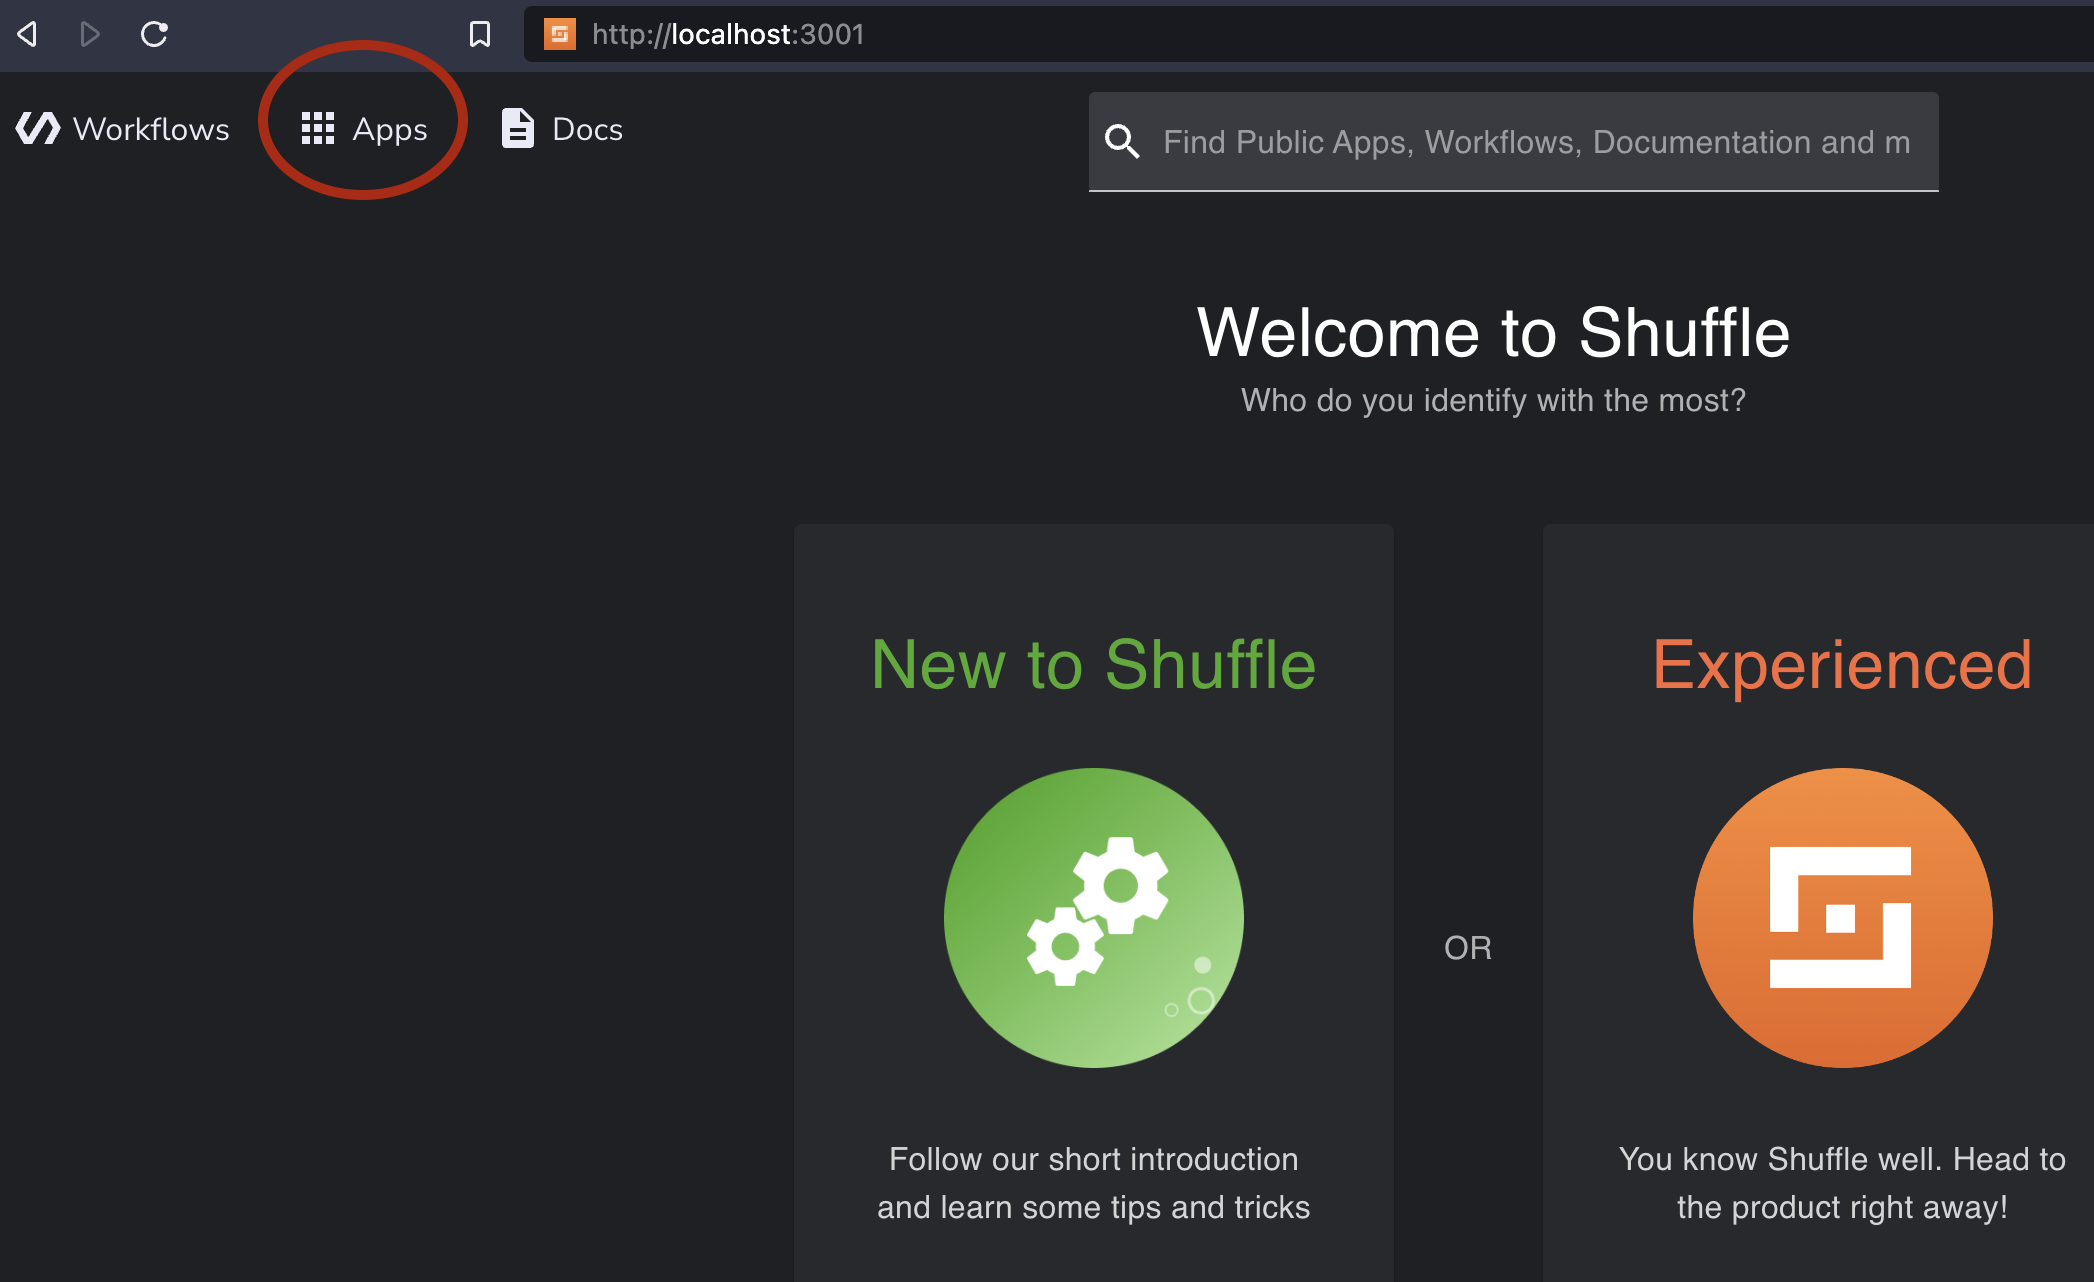
One of the four containers created by Docker-compose is called frontend and may be accessed at http://localhost:3001 (or name of the machine where you deployed it). HTTPS is reachable on port 3443 with self-signed certificates).
- Create your admin account (username and password required). There is no default username or password for Shuffle.
- Use the same username and password to log in.
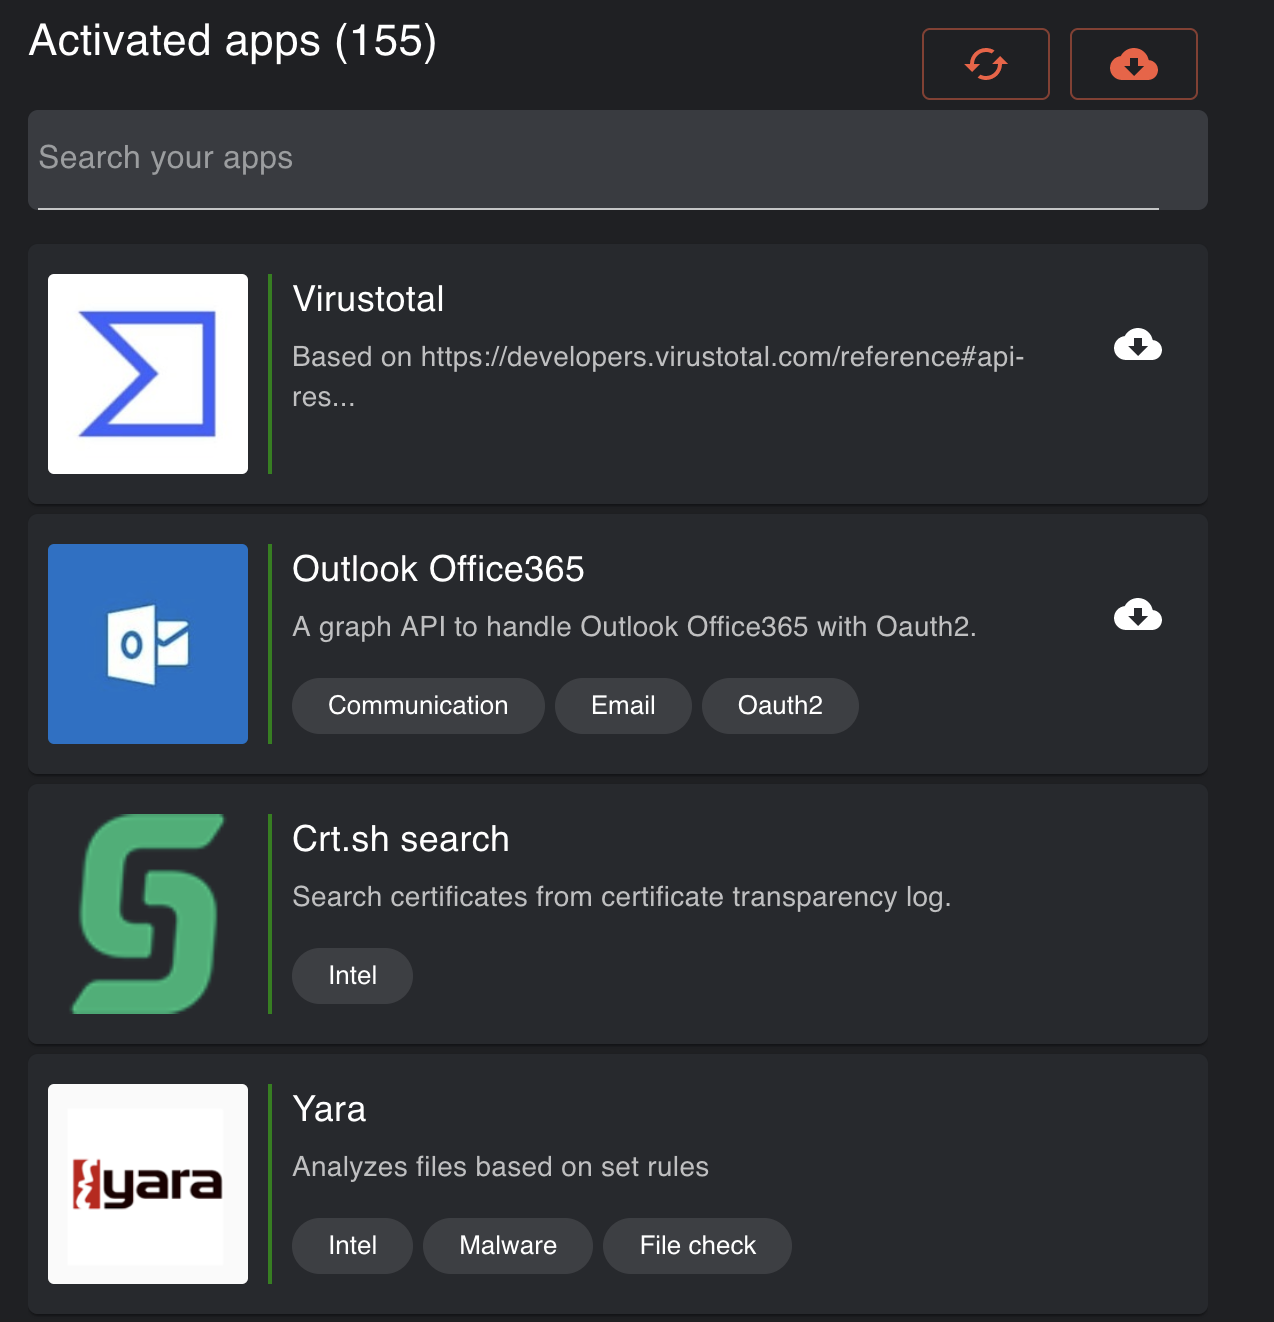
- Navigate to the /apps and verify that you see default applications
Initial installations are now completed and we are ready to build our first workflow that automates Phishing email analysis.
Building a Analysis Workflow
Ready made workflow is available on Shuffle website, but in this post we will build our own workflow from scratch. This will give us a better understanding of how Shuffle works.
Adding Microsoft Outlook Node - Part I
This article assumes that you are using Microsoft O365 services for emails. Out-of-the-box Shuffle supports O365, On-Prem Exchange, Gmail and basic IMAP email providers.
In general, organisations utilise conditional access and two-step authentication. And because we want emails to be retrieved automatically without human input, this makes it challenging to integrate the system with Exchange. There are several ways to resolve this.
- Using Application Passwords for dedicated phishing email account.
- Disable MFA for that account.
- Redirect email to e.g., Google.
BUT THERE IS A CATCH!
In the year 2019 Microsoft decided to remove the option to use plain Basic Authentication for various services, and Exchange was one of them, and Shuffle OOB Application uses basic authentication.
Quote from Microsoft
We’re removing the ability to use Basic authentication in Exchange Online for Exchange ActiveSync (EAS), POP, IMAP, Remote PowerShell, Exchange Web Services (EWS), Offline Address Book (OAB), Autodiscover, Outlook for Windows, and Outlook for Mac.
So this leads us to the problem that we can’t use OOB Shuffle application for fetching emails from O365 Exchange. Luckily there is a way to do modern authentication to O365 via Graph API.
Addign Microsoft Outlook Node - Part II
Apps are the primary building blocks in Shuffle workflows. Apps can be auto-generated from OpenAPI specifications or using Shuffle’s Python app SDK. These additional OpenAPI apps can be imported to Shuffle via UI.
Luckily Frikky has already created OpenAPI based App for Microsoft Graph API, which handles the authentication via OAuth 2.0, and can retrieve users’ emails (and do much more).
I modified that app a little bit to get more functionalities. Normally, you should do the following:
First you need to go to the Shuffle website and search Outlook Office365 and download OpenAPI specification for that app.
But now with the modified version, you should download it from my Github repository. It’s just a plain .yaml -file. Trust me, it’s safe. In future, I will update the original O365 app with these changes.
Next we need to import that app to our own Shuffle instance. Go to your Shuffle instance (e.g., http://localhost:3001/apps/) and upload just downloaded file.

Next we need to register a new app to Microsoft Azure portal.
Registering app for Graph API
- Make sure you have admin rights to Azure portal
- Login to Azure portal
- Search “App Registrations”
- Create a new app, set the name to whatever you desire.
- Choose “Accounts in this organizational directory only (XXXX only - Single tenant)”
- Set the redirect URI (Web) to your Shuffle instance: https://HOSTNAME:3443/set_authentcation and click register. HOSTNAME need to be resolved by your browser. It does not need to be resolvable from Internet.
- Now make sure to write down the Client ID and Tenant ID down, since we will need those on latter steps.
- Under “Certificates & secrets”, generate a new client secret. Write down the generated secret.
- In the left sidebar click “API permission”. This will give us permission to access what we desire from the API. In the table you should see “Microsoft graph”, click on it and you should see 2 types of permissions. Delegated and Application. Choose Delegated
- Search Mail.ReadWrite, offline_access and user.read and add a checkmark to those
- Click Add Permissions
- Click “Grant admin consent for XXX”.
- Profit?
So, now you should have a new App and the secrets you need on the next steps.
Application registeration images


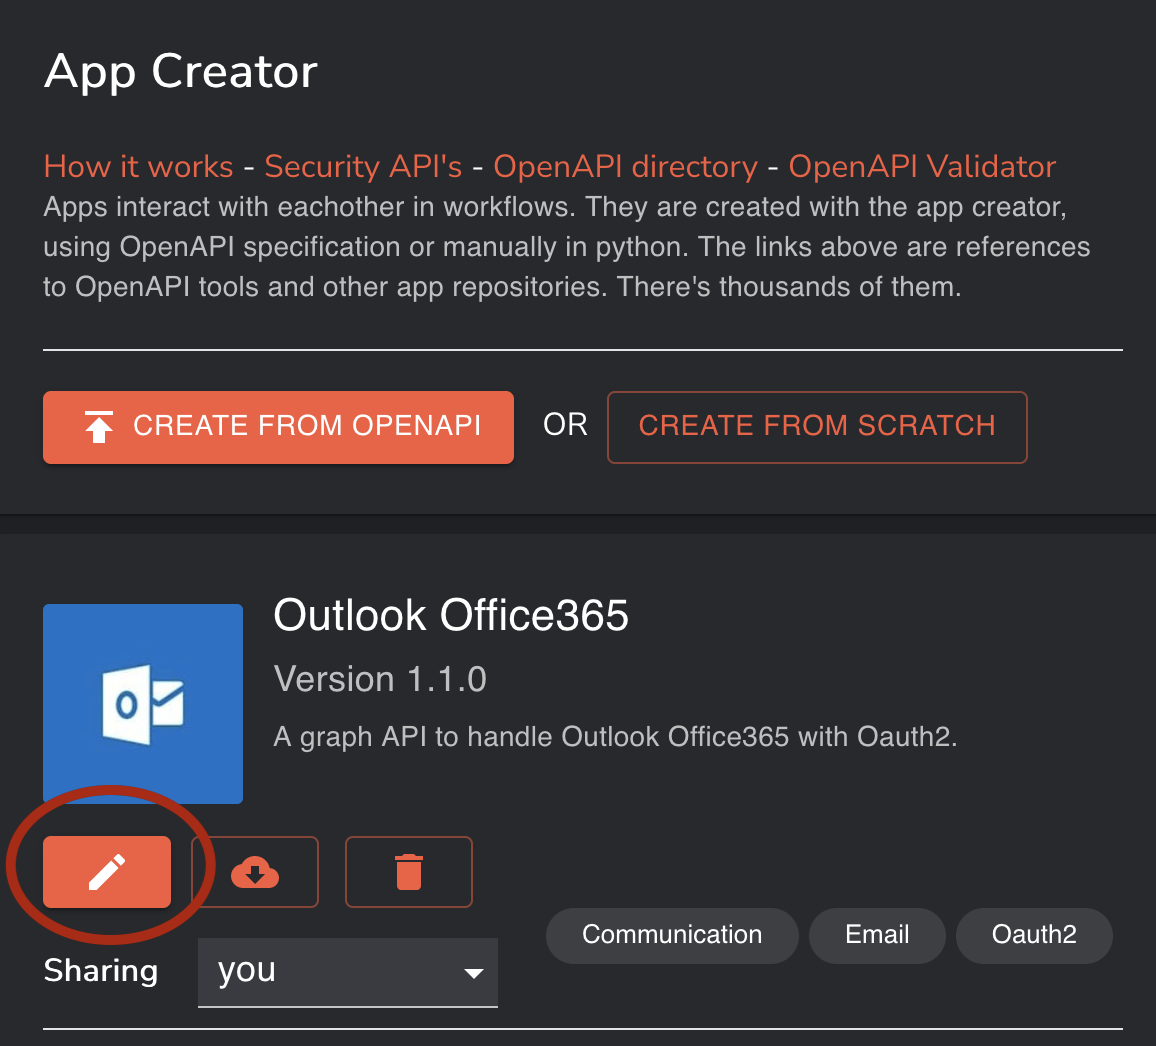
Modifying the Outlook Office365 App
There is couple of things that need to be modified before the app can be used. Go to “/apps” and from the right side select Outlook Office365 v2* and click the pencil icon.
Substitute TENANT_ID with your own Tenant ID.
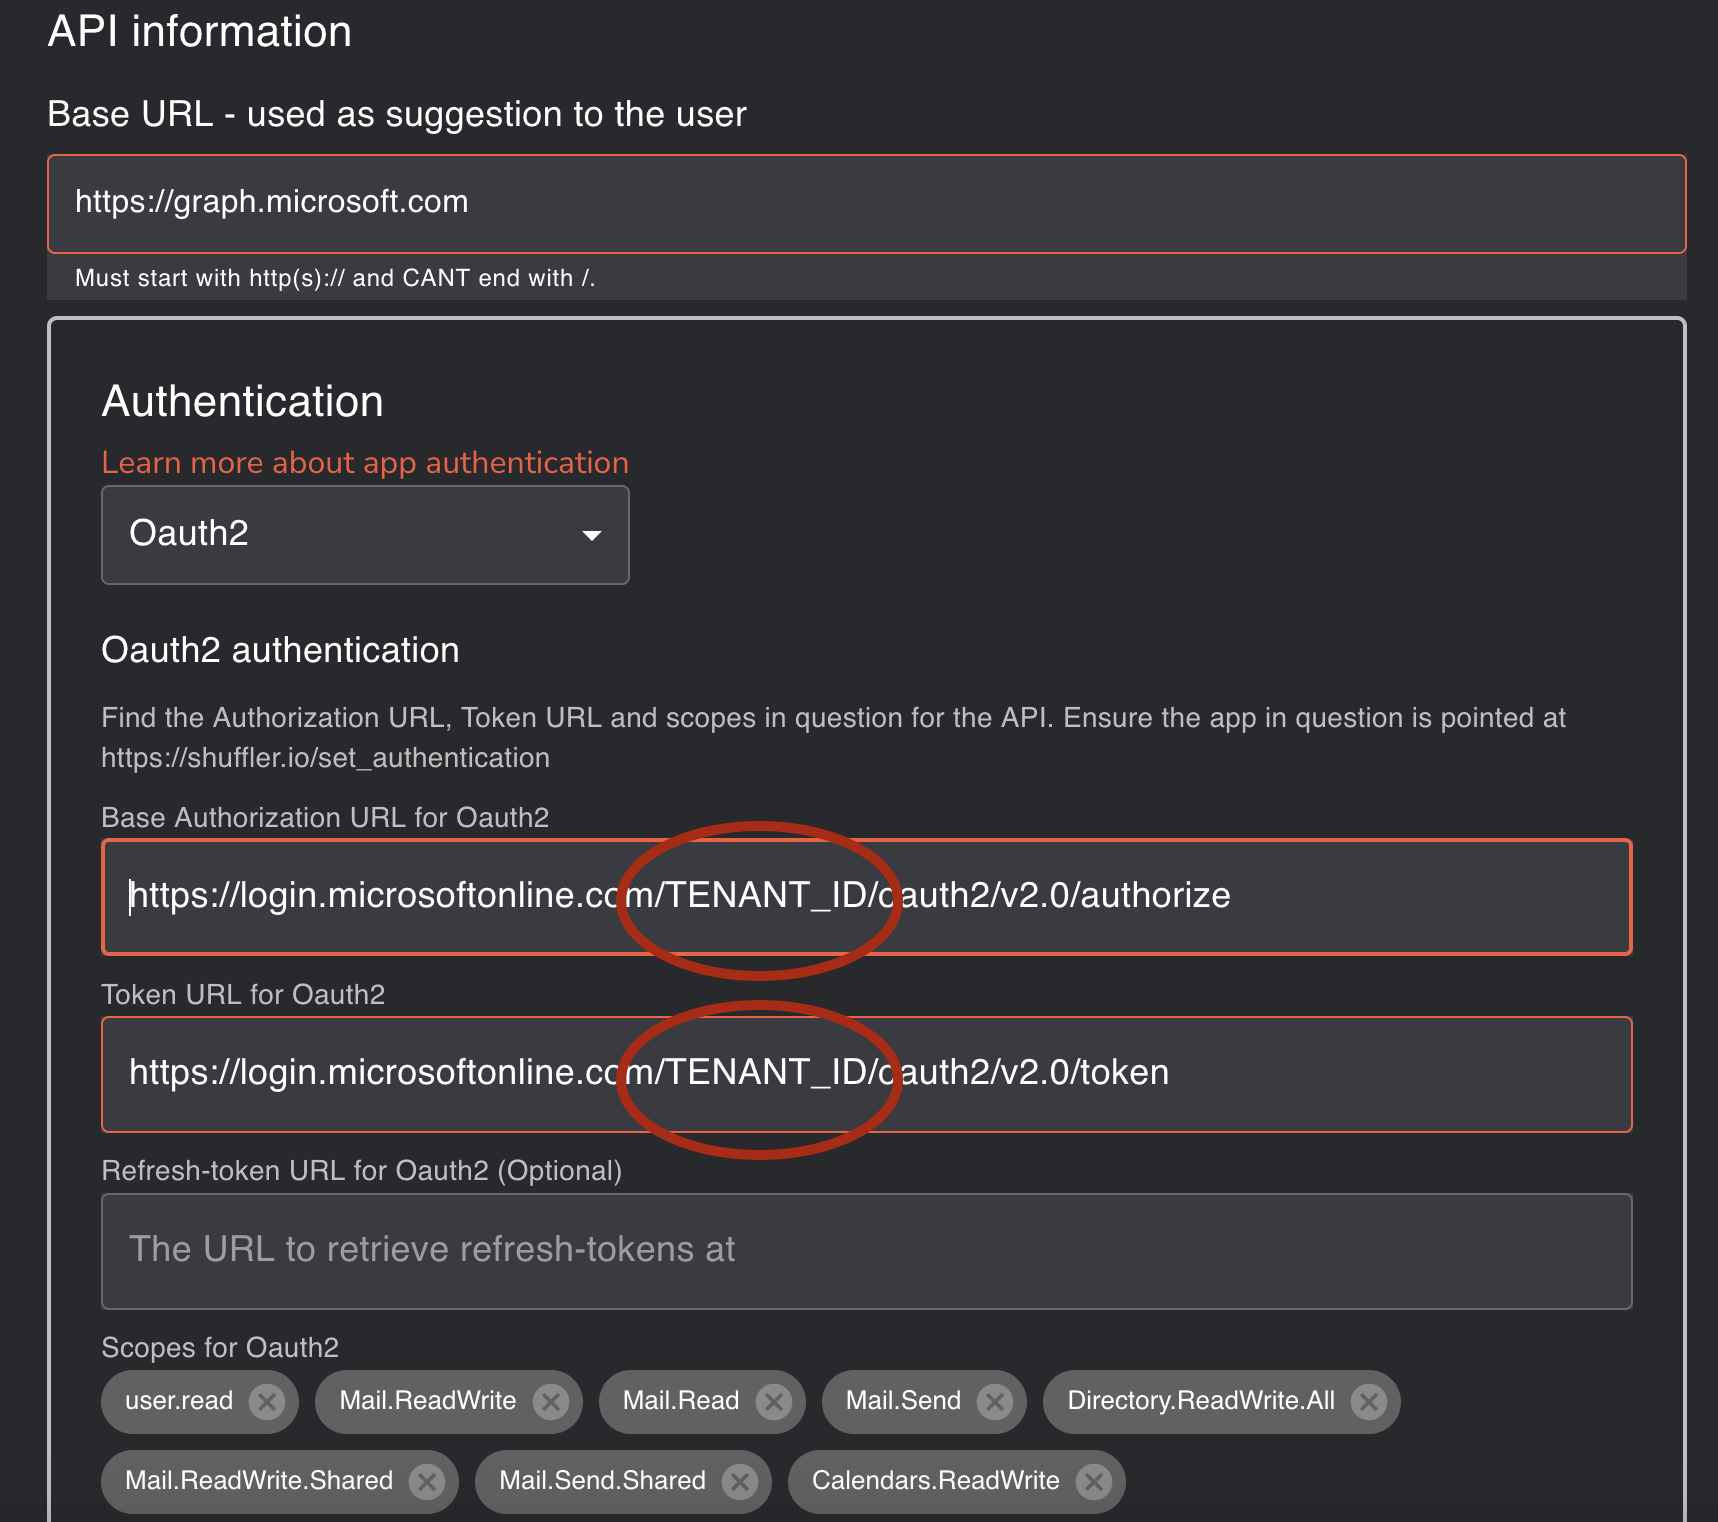
Scroll down and click Save
Creating Workflow for Analysis
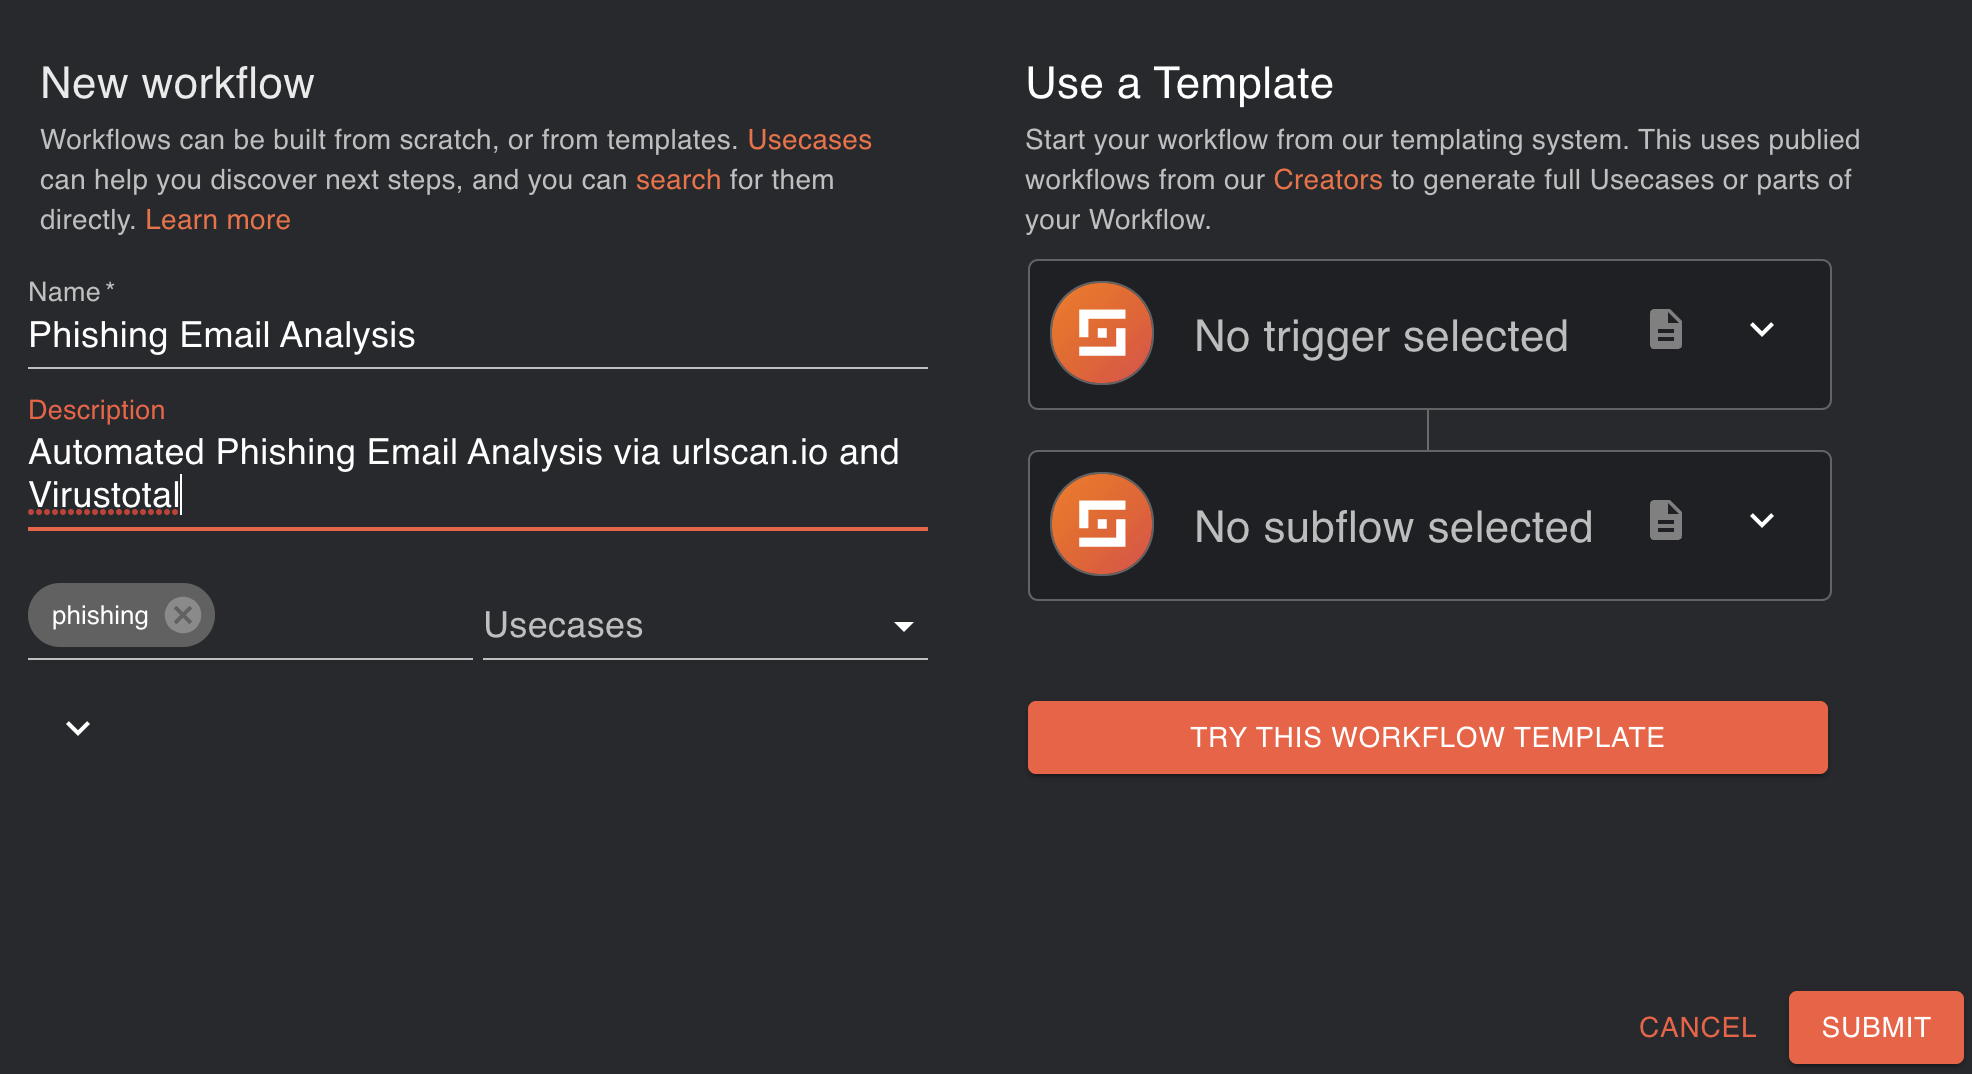
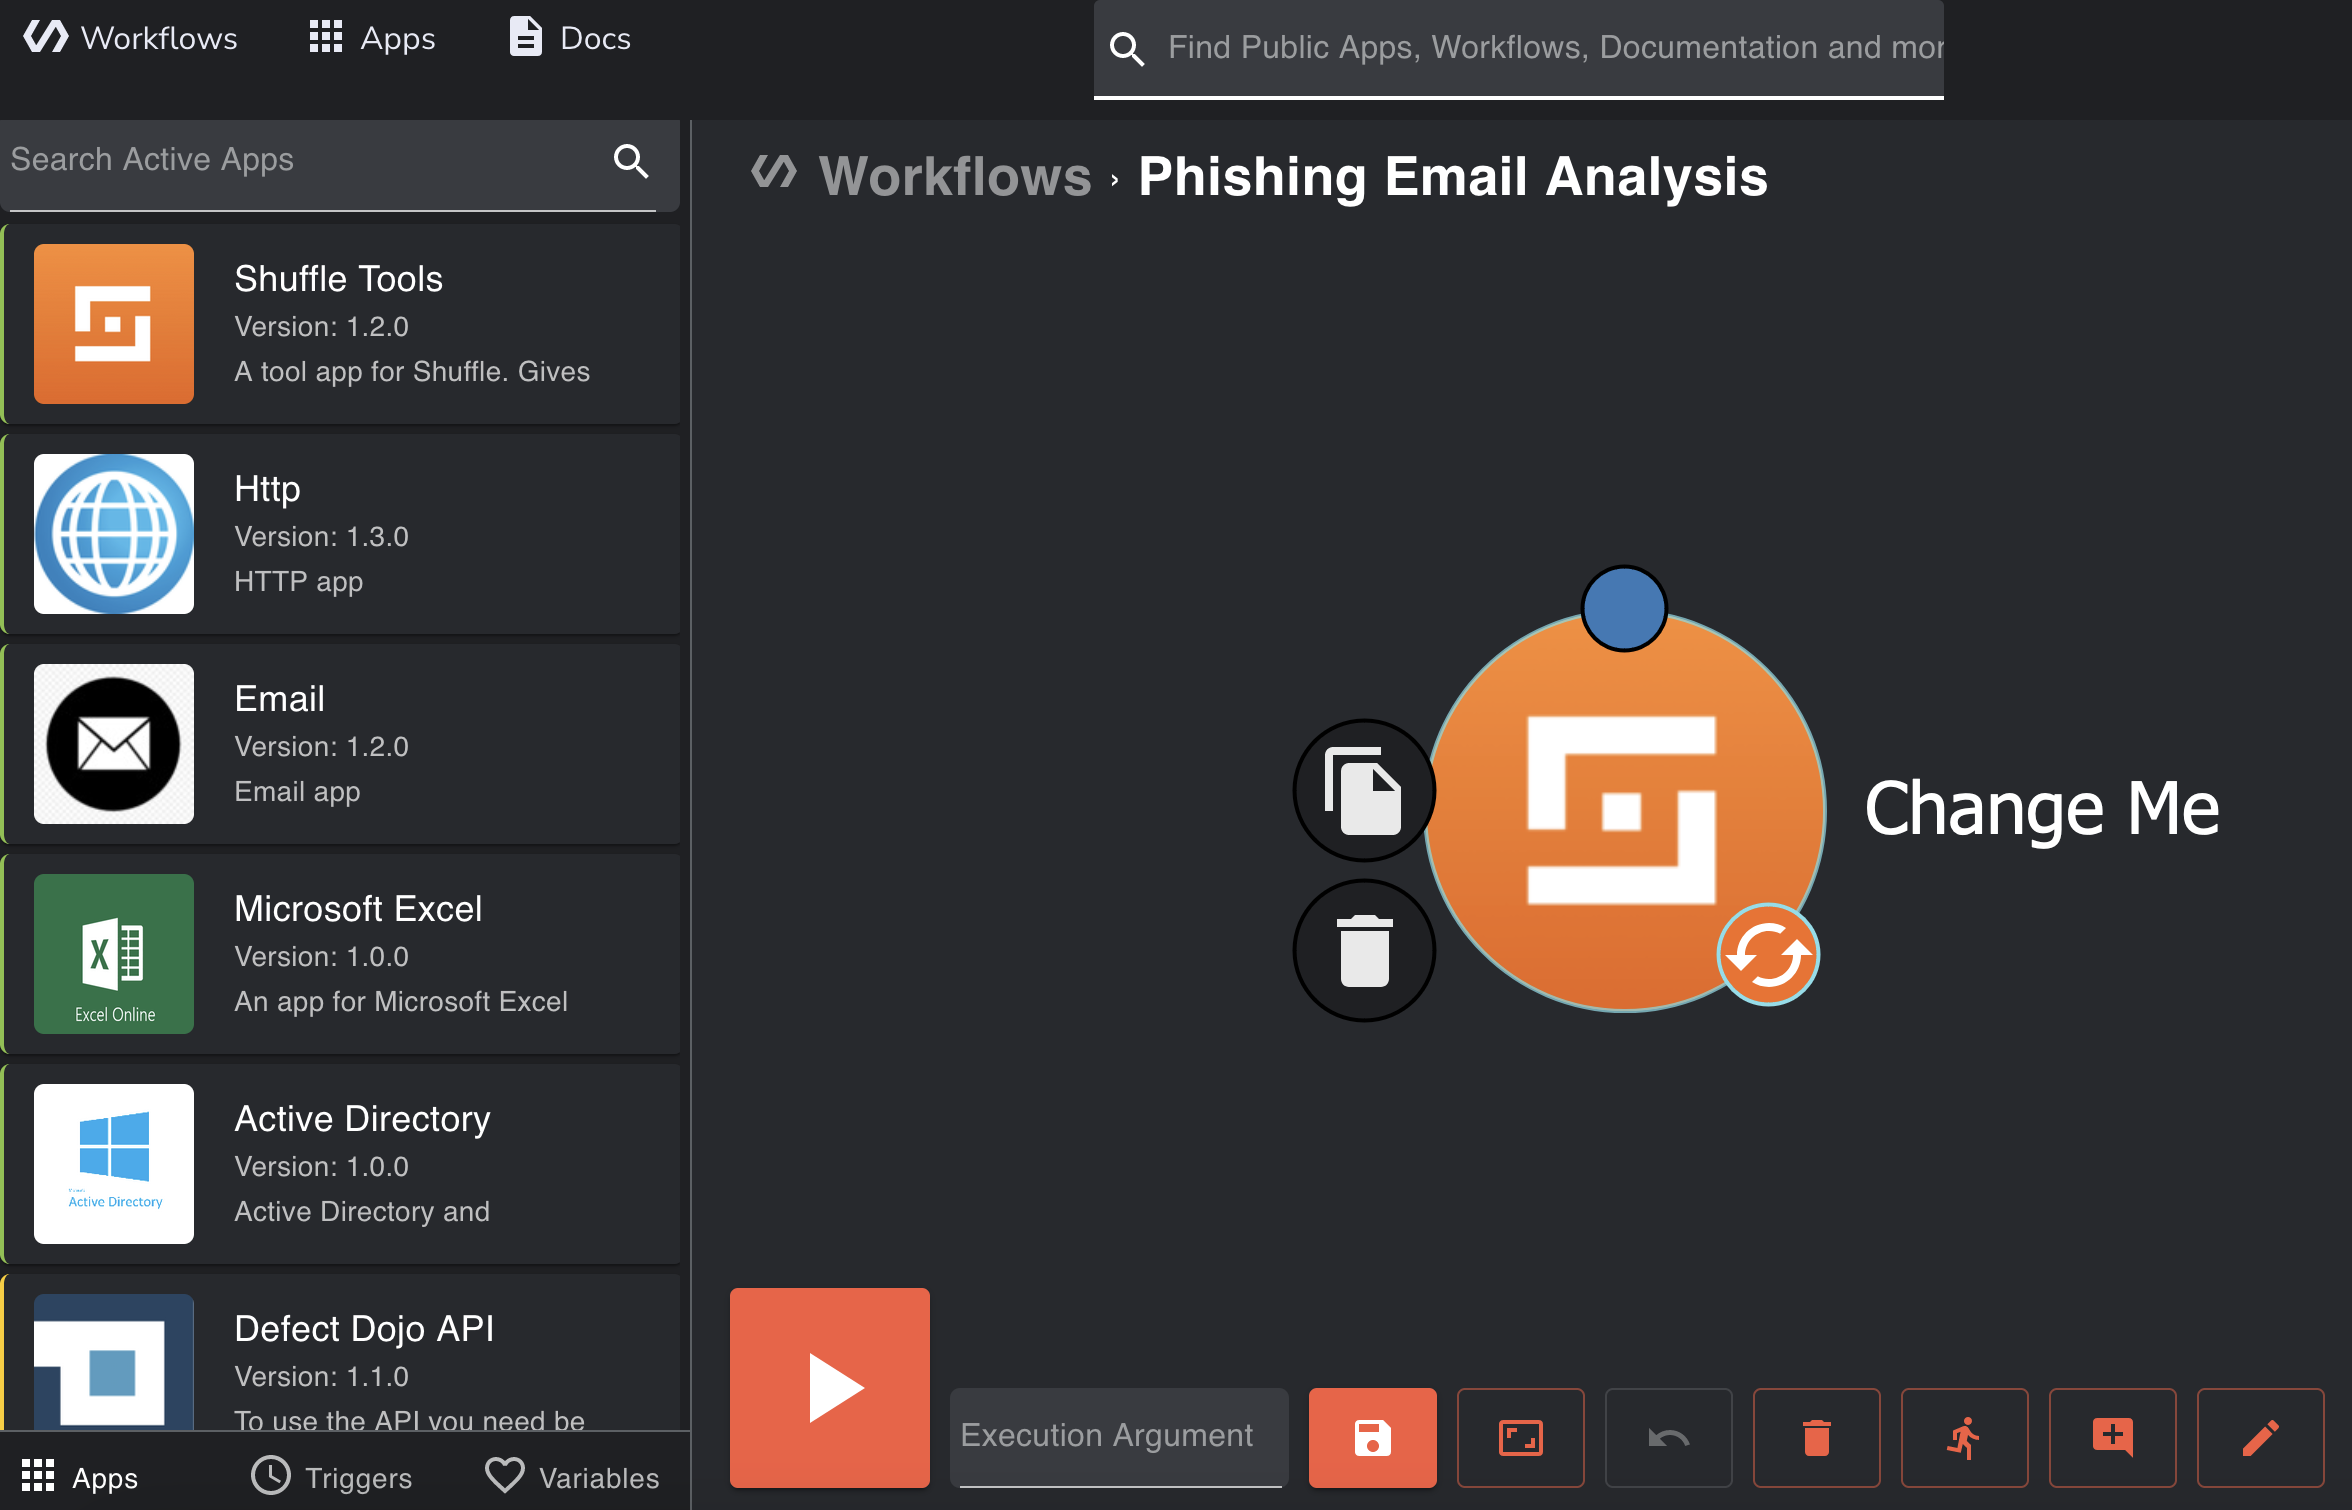
Go to the Workflows section, click New Workflow, and then enter a name and description of your workflow. You probably noticed that templates are also available. Templates will be covered in the following articles.
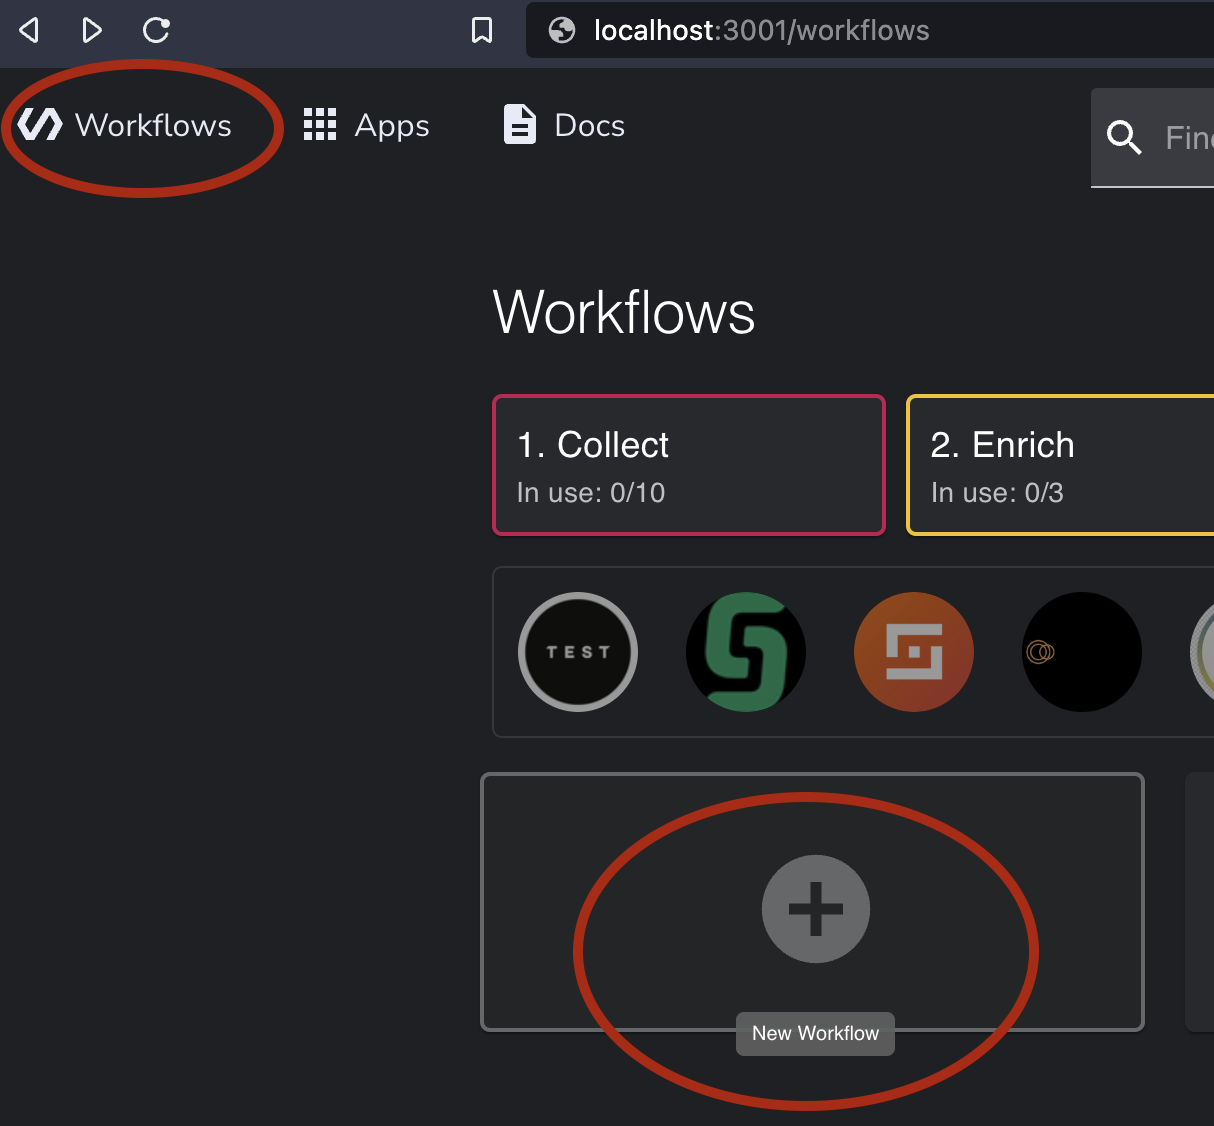
You should see an almost empty canvas where we can add new steps.
Adding the Mail Fetching Node
So let’s get started!
As I mentioned before, you can get prebuild workflow from the Shuffle website. However, you must take the following actions if you wish to build it from scratch.
Shuffle’s interface works mainly on the drag-and-drop principle. Everything can be moved with the mouse.
- Search Outlook Office365 v2 from the left side and drag it to the canvas.
- Click the node and you should see the configuration window on the right side.
- Click the AUTHENTICATE OUTLOOK_OFFICE365_v2 button.
- Substitute CLIENT_ID and CLIENT_SECRET with the values you wrote down earlier.
- From Scopes select user.read and mail.ReadWrite.
- Click Manually Authenticate
- Normal O365 login pop-up should appear. Login with the credentials of the mailbox you want to monitor.
- You should see a success message.
- From App configuration select Find Action “Get mails from folder with filters”
- From Folder select Inbox


You can test if it works by clicking Play-button. It should fetch the first unread email from selected mailbox / folder.
Now you should have node which fetches emails from the mailbox. Next we need to add node which will parse the email and extract the links from it.
Adding Analysis Nodes
Shuffle tools node is very powerful and you can do almost anything with it. However, in this case, we will use only couple of them. First one is Parse IOCs
- Drag Shuffle tools node to the canvas
- Name it Parse_iocs
- Find action Parse ioc
- Click autocomplete button (Plus-sign) and navigate to “fetch email / body / body / content” (You can also type it manually) - $fetch_emails.body.value.#.body.content
- Done!
Parse_Iocs node should automatically connect to the previous node. If it does not, you can connect them manually by dragging the arrow from the previous node to the Parse_Iocs node. You can add conditions to the arrow by clicking the arrow and selecting the condition from the right side.

Now you have a basic understanding of how these nodes work. I will go briefly through the rest of the nodes.
Fetching user ID
- Add a new Outlook node
- Name it Fetch_UserID
- Find action Get me
Fetch Raw email
- Add a new Outlook node
- Name Fetch_raw_email
- Select Get raw email as file
- Input $Fetch_emails.body.value.#.id to Message id -field
- Change To file to True
Analyze raw email
- Add Email_Analyzer node
- Name it Raw_Email_Analyzer
- Find action Parse email file
- Input $Fetch_raw_email.#.file_id to File id
- Select eml as File extension
Filtering IoCs
- Add Shuffle tools node
- Name it Filter_Urls
- Find an action Filter list
- Input $Parse_iocs.#0 to Input list
- Input data_type to Field
- Check equals
- Input url to Value
Add start node
- Add Shuffle tools node
- Name it Start_Analysis
- Find an action Repeat back to me
- Add conditions to the arrow from Parse_iocs to Start_Analysis. Condition should be {{ $Filter_urls | size }} is Larger than 0

Add Urlscan.io node
- Register to URLScan.io - its free! And get the API-key from here.
- Search and add Urlscanio
- Name it Urlscan_Send
- Authenticate with your API-key
- Find an action Submit URL
- Input $Filter_urls.valid.#.data to Url
Add VirusTotal node
- Register to VirusTotal - its free! And get the API-key from here.
- Search and add VirusTotal
- Name it VirusTotal_Send
- Authenticate with your API-key
- Find an action Get Url Report
- Input $Filter_urls.valid.#.data to Resource
Add Pause node
- Add Shuffle tools node
- Name it Pause_for_1_min
- Set Delay to 60
- Find action Report back to me
Add Mark email as Read node
- Add a new Outlook node
- Name Mark_as_read
- Find an action Mark as read
- Input $Fetch_userid.body.id to User id -field
- Input $Fetch_emails.body.value.#.id to Message id -field
Add Urlscan.io node
- Add Urlscanio node
- Name it Urlscan_Get_report
- Find an action Get result
- Input $Urlscan_send.body.uuid to Uuid
Add Teams notification node
- Generate webhook URL to Teams Channel where you want to send the notifications. You can do it from Teams -> Teams Channel -> Connectors -> Incoming Webhook.
- Search and Add Microsoft Teams node
- Name it Teams_notification
- “Authenticate” with webhook URL
- Find action Send Rich Text
- Input New phishing attempt analyzed to Title
- Input
 1<b>Subject</b>: $fetch_emails.body.value.#.subject
 2
 3<b>From:</b>  $fetch_emails.body.value.#.sender.emailAddress.address
 4
 5<b>Date:</b> $email_analyzer.#.header.date
 6
 7<b>Potential phishing URL:</b> $filter_urls.valid.#.data
 8
 9<b>Via:</b> $email_analyzer.#.header.received_domain
10
11<b>URLScan message:</b> $urlscan_send.#.body.message
12
13<b>URLScan Report URL:</b> $urlscan_send.#.body.result
14
15<b>Virustotal report:</b> $virustotal_send.#.body.permalink
16
17<b>Virustotal Verdict:</b> $virustotal_send.#.body.positives / $virustotal_send.#.body.total
to Message -field.
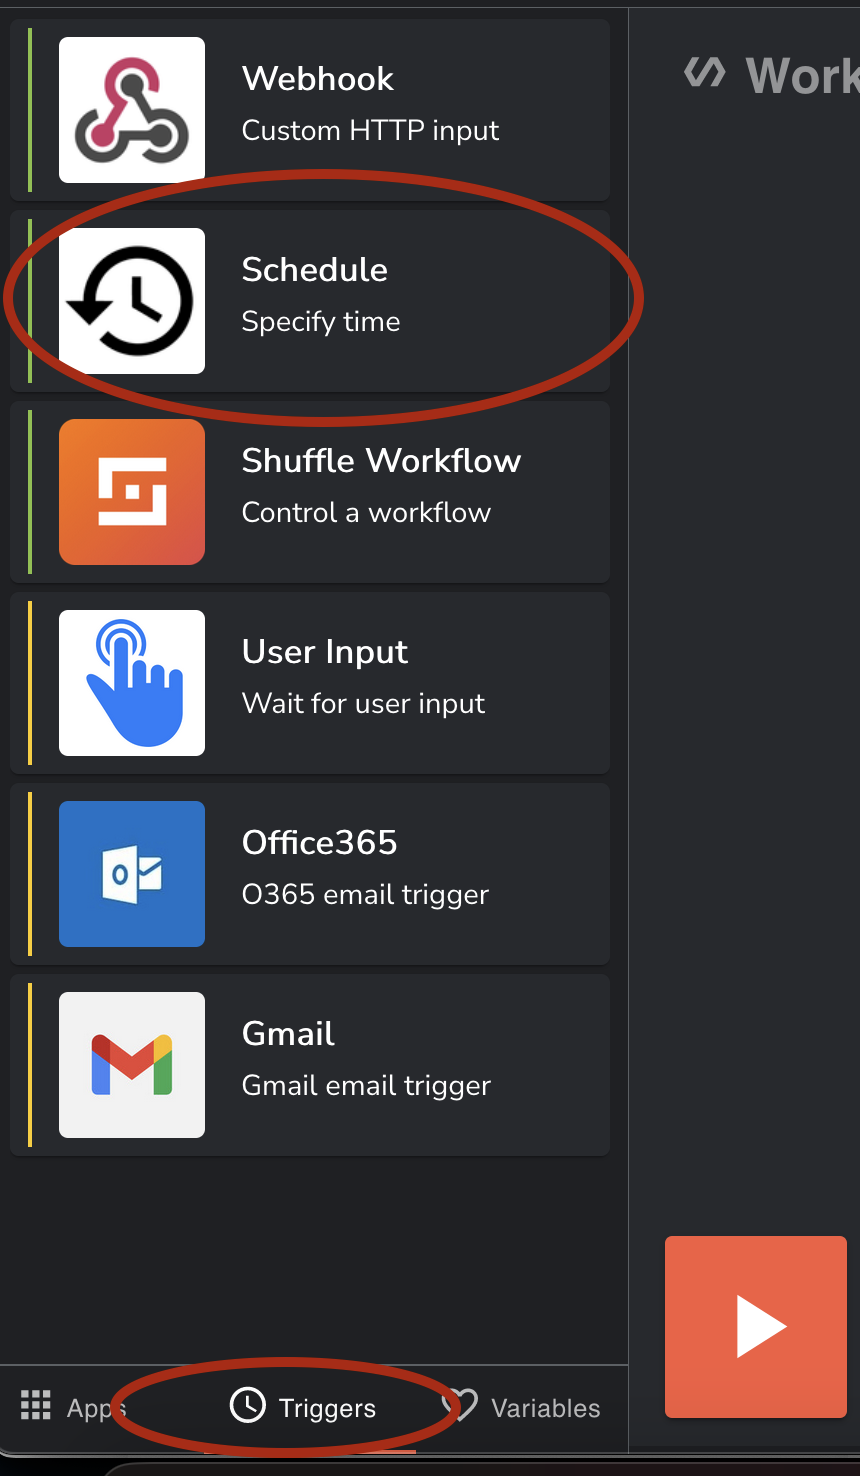
Adding Trigger node
- On the left side, click Trigger -tab
- Select Schedule -node
- Name it Every_five_minutes
- Set an interval to 300 seconds
- Connect the arrow from Every_five_minutes to Fetch_emails
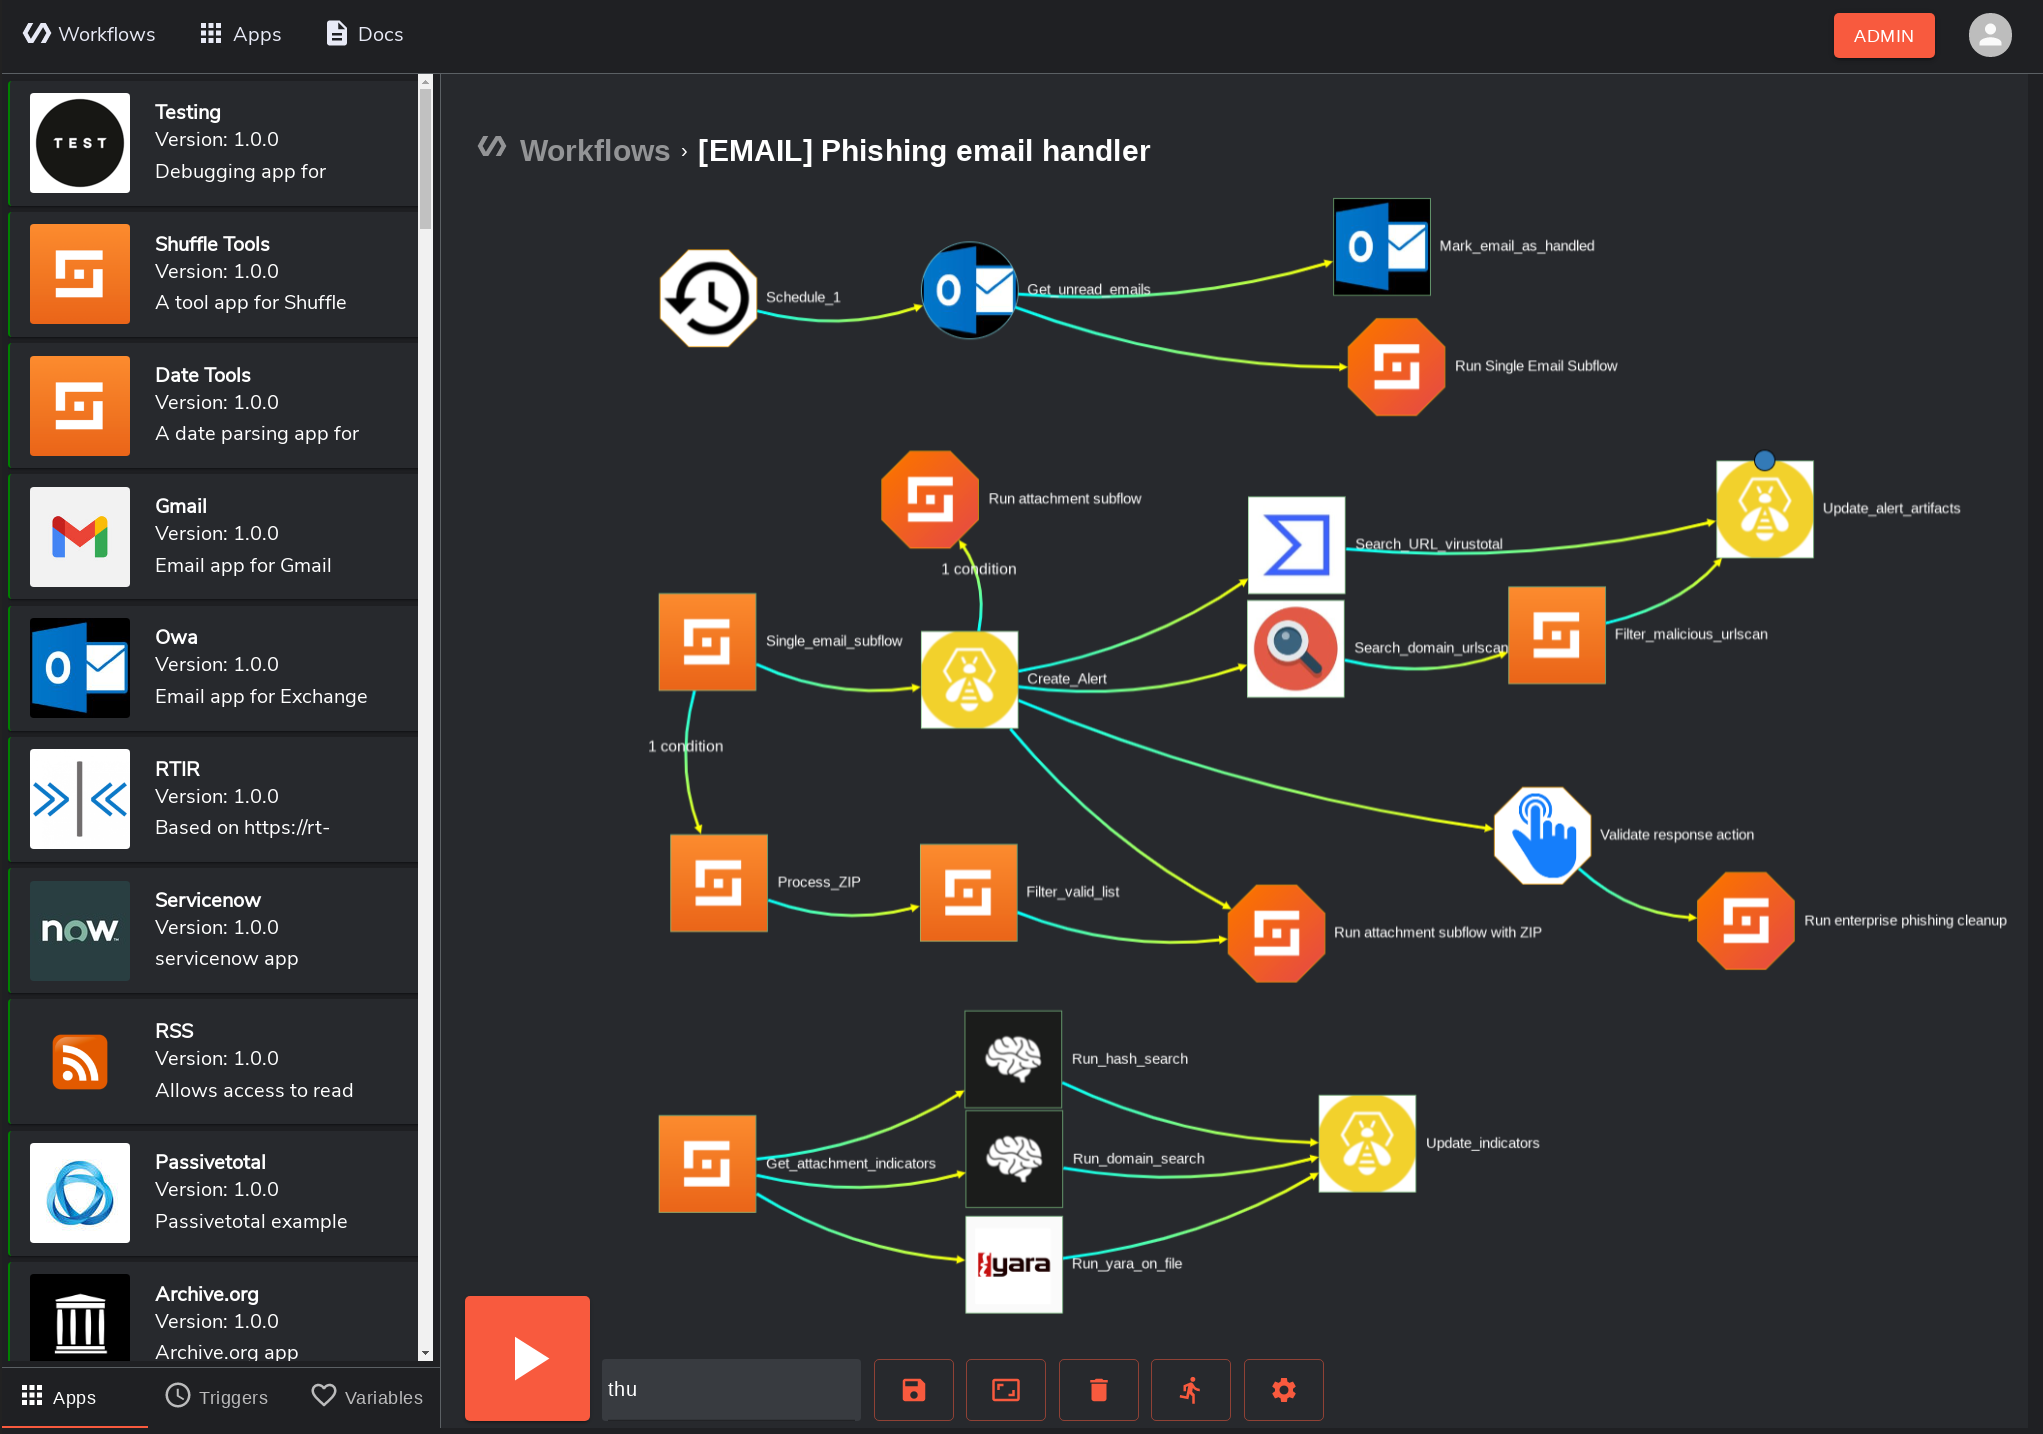
Final Workflow
Huh, that was a ride and we are finally done :D Now you should have a workflow that looks something like this

Testing the Solution
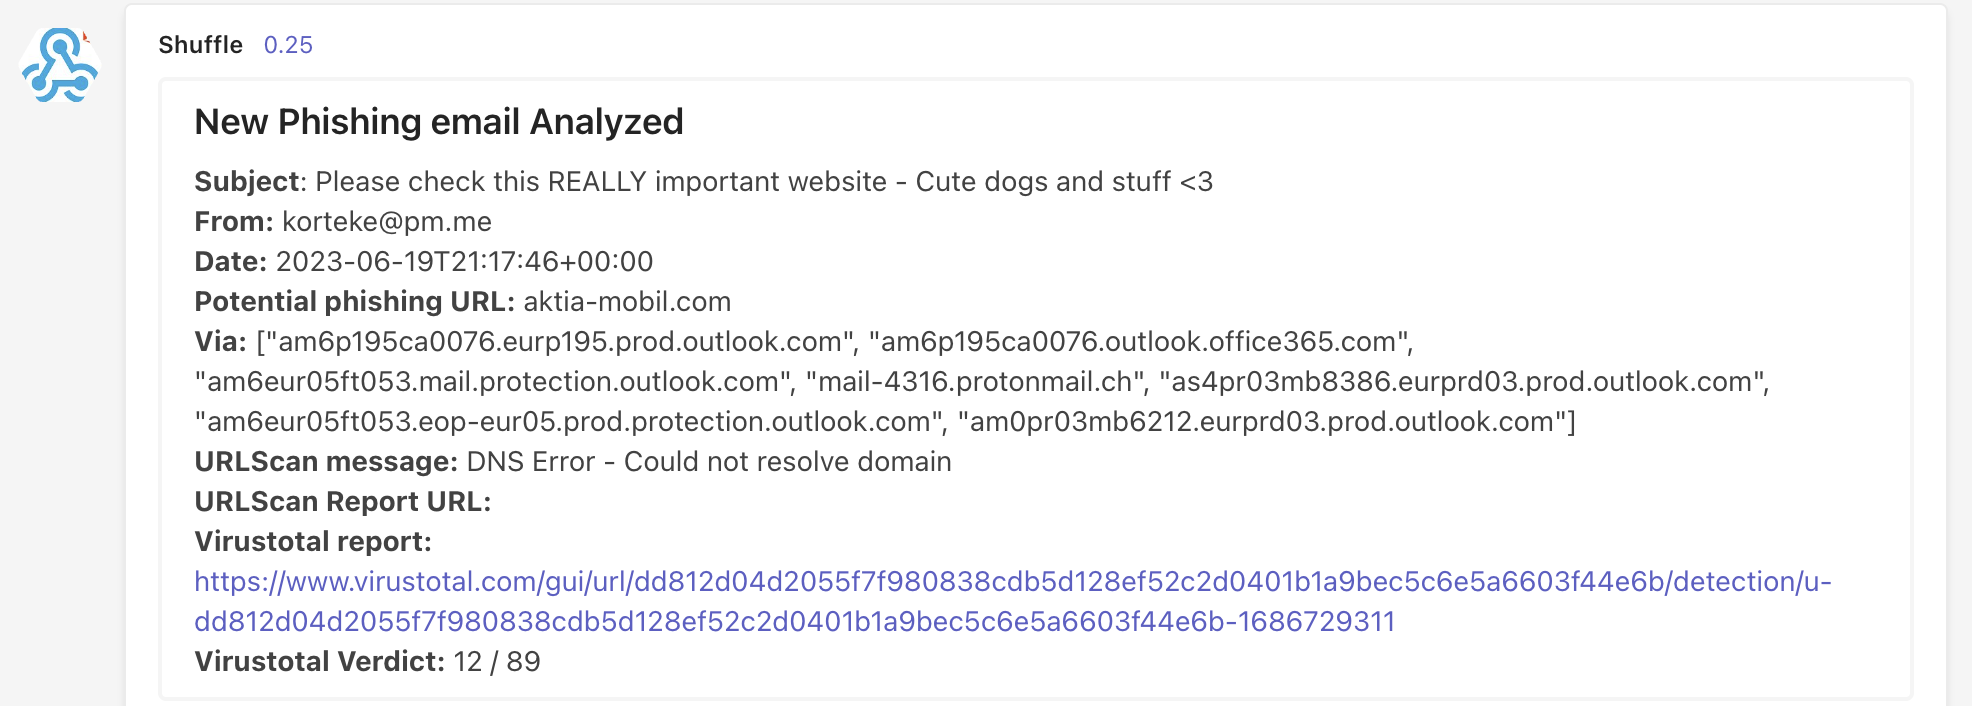
Now you can test the solution by sending an email to the mailbox. You should receive a notification to the Teams channel you configured. I sent an email with the following content. It’s not a really good phishing email, but it’s good enough for testing.

In real phishing emails there will be lots of HTML and CSS code which leads probably to false positives. Also domain that was used was a real phishing domain that is already offline, but Virtustotal has history data. That’s why Teams message will lack info from Urlscan.io.
Received Teams message will look like this:
Improving the Solution
The analysis works, but there is much space for improvement.
For example, you could add more analysis tools to the workflow. You could also add more conditions to the workflow. For example, if the email is from internal sender, you could send a notification to the sender that the email was analyzed and it was not malicious.
Also, the workflow is not very efficient and accurate. There will be always false positives and false negatives. But the general idea is to do the initial analysis automatically and then do the manual analysis if needed. Also there probably should be some kind of allow/block list for domains and URLs, which is checked before data is sent to 3rd party.
If organisation has a takedown service, e.g., Netcraft Takedown you could add it to the workflow. For example, if the email is malicious, you could automatically send takedown request to the hosting provider. This should include some kind of a threshold; so that you don’t send takedown requests for every single phishing email.
That threshold could be some kind of simple mathematical formula, which calculates the risk level of the email. If Virustotal has 10/93 detections, the risk level is probably low and it will increase total risk level only by 10? points. But if Virustotal has 93/93 detections, the risk level is high and it will increase total risk level by 93. Same thing with the Urlscan.io. The report will give us a verdict if they think that URL is malicious or not. If the verdict is malicious, it will increase total risk level by 100. If verdict is not malicious, it will increase total risk level by 0. If the total risk level is over 100, Shuffle could send takedown request automatically.
Final Thoughts
This was a very good proof-of-concept exercise, however, it was far from perfect. The user experience of Shuffle should be improved significantly, but the automation and the way the apps work are nearly flawless. It took a surprising amount of time to find and utilise the correct JSON paths, but it’s not rocket science.
It would be nice to try to integrate ChatGPT to the workflow. LLM’s are really good at completing code and give suggestions, so it would be interesting to see how it would work in this case. Can we classify IOC’s with the help of GePeTo?
Just quick test with ChatGPT-3.5 and ChatGPT-4


Looks promising! I am pretty sure that I am going to investigate this a little bit more in the future.
As I mentioned at the beginning, this is the first in a series of posts about analysing phishing emails. The following posts will cover how to handle attachments in emails, as well as how to integrate this entire process with the Ticketing system. The Hive will be used as the ticketing system in this case because it is designed for usage in situations like these. Stay tuned!